Since I received the clay and tools I ordered a few weeks ago, I’ve tried out the various types of clay and made some short videos that I cut together to a longer clip. I started out with a material called Bubber, which handles a bit like snow (except that it isn’t cold). It comes in powder form and you just work it with your hands until it becomes more solid. It’s very light and pretty easy to make shapes with but doesn’t hold together very well so I quickly gave up using it for animating figures. I’ll probably use it for props and other background material.
The second material I tried was the clay Plastilina. This is the type of clay I used to play with as a kid so it’s pretty easy to work with, and the box I bought contained a variety of colors although the amount of clay per color was a bit limited. I managed to create a face and I stuck it on a toothpick (which in turn was stuck in a piece of clay) so that I could manipulate the head without having to worry about putting it back in the same place after each frame.
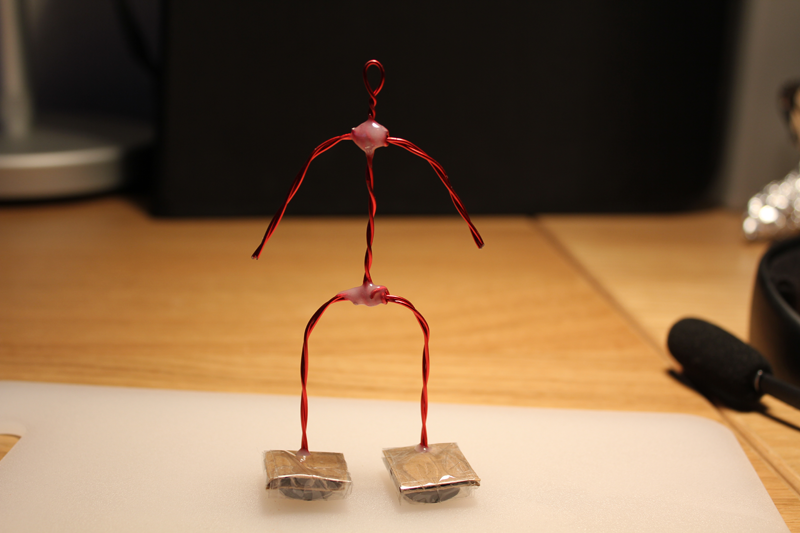
For the third and final experiment I decided to create a clay man, with armature and all! The armature was created with aluminum wire that I folded in two, twisted to make it stronger, and cut into pieces for legs, arms and spine. I glued the pieces together with epoxy and for feet I cut out some cardboard onto which I taped magnets. This was to test if it was possible to avoid having to balance the guy too much by using a metal floor and having it stick firmly to it. The finished armature can be seen below.
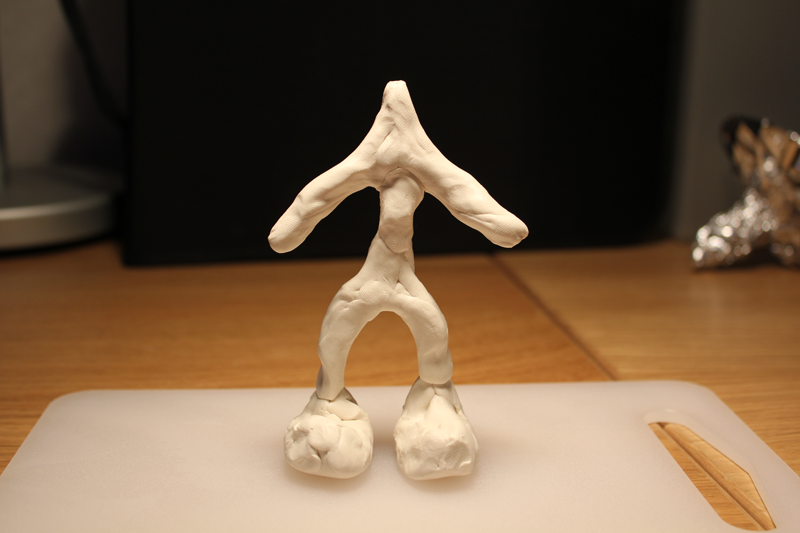
Once the armature was done, I started covering it with clay. This time I used a third type of clay, Plastimat, of which I had bought a white 1kg lump. I started cutting it into smaller pieces since it’s a pretty tough material, then worked it into smaller balls that I could divide into even smaller pieces. I went ahead and made a rough skin on top of the armature, and it was starting to look pretty good!
Now all I had to do was create a head and attach it to the body. I made a little ball of clay and massaged it a bit so that it had facial features like eyebrows, eyes, a nose and a mouth. Then I pushed it onto the neck, making sure that it was securely attached and not about to fall off anytime soon. I also smoothed out the skin all over to make him look a bit more clean.
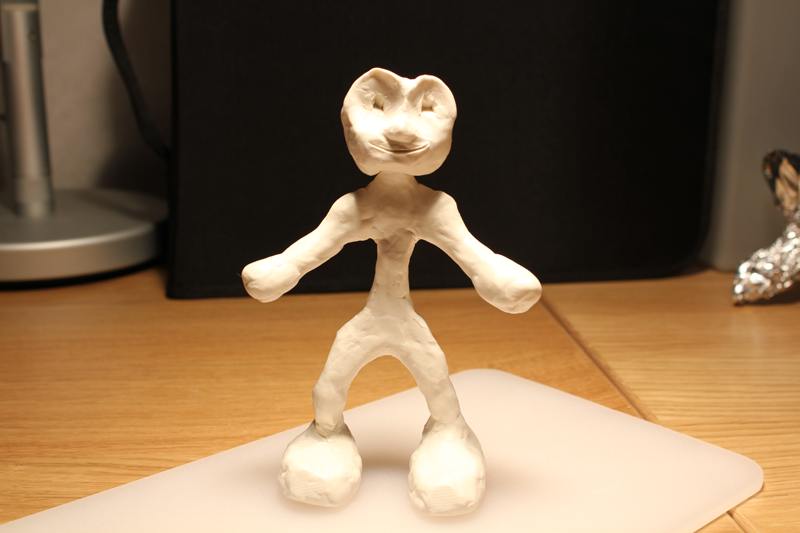
Once the head was in place, I took a few test shots. However, I wanted the eyes to stand out a bit more and took a tiny bit of black Plastilina and made two eyes that I put on broken off toothpicks and stuck into the eye sockets. Happy with the new pair of eyes, I began my first shooting of a complete clay figure. Since I was only experimenting, I didn’t plan any specific things for the clay man to do, but rather made it up as I went along. I started by moving the arms and head, then tried lifting one leg a bit. This is when I realized that the feed were way too heavy in relation to the rest of the body! I didn’t find many positions where with one leg in the air without him falling in some direction, and I only had a cardboard floor so I couldn’t try out the magnets to see if they would have helped. I ended up sticking a couple of small cardboard rectangles under his left foot as he’s starting to lift it, but thankfully it got easier to balance him once his left foot got a bit higher off the ground. As I was moving him into different poses, I noticed that the clay got softer and softer the more I worked with it (as it should). This lead to me having to lift the skin back in place where I had pressed a lot to move the armature, to avoid having him look like he suddenly lost all of his muscles. Other than that, he behaved pretty well although both him and the backdrop fell over a couple of times 😉
All in all, I’m pretty pleased with my first staggering attempts at clay animation, and I have certainly learned a thing or two about what to do and what not to do. I’ll continue my clay experiments during the weekends when I have the time (it’s very time consuming!) and post my progress here. Enjoy the short clip I cut together from the shooting sessions with the three different materials described above.